Google Cloud Platform (GCP) のIaaSである Google Compute Engine (GCE) のバックアップを取得したい場合、GCPにはバックアップ用途で利用出来る機能が複数あり、スナップショット、カスタムイメージ、マシンイメージといったものが利用可能である。
その中でもスナップショットは他の機能と比べてコストが低く、無料枠も存在するため費用を抑えてバックアップを取得したい場合に適している。
本ナレッジではそのスナップショットの使い方について説明する。
スナップショットのより詳細な価格や無料枠および特徴、さらにカスタムイメージ、マシンイメージについては以下ナレッジ参照。
また、もしGCE自体の作り方が不明の場合は以下ナレッジ参照。
Sponsored Links
GCE スナップショットの作成手順
作成済みGCEからスナップショットを作成する手順を以下に記載する。
- GCPコンソールにアクセス
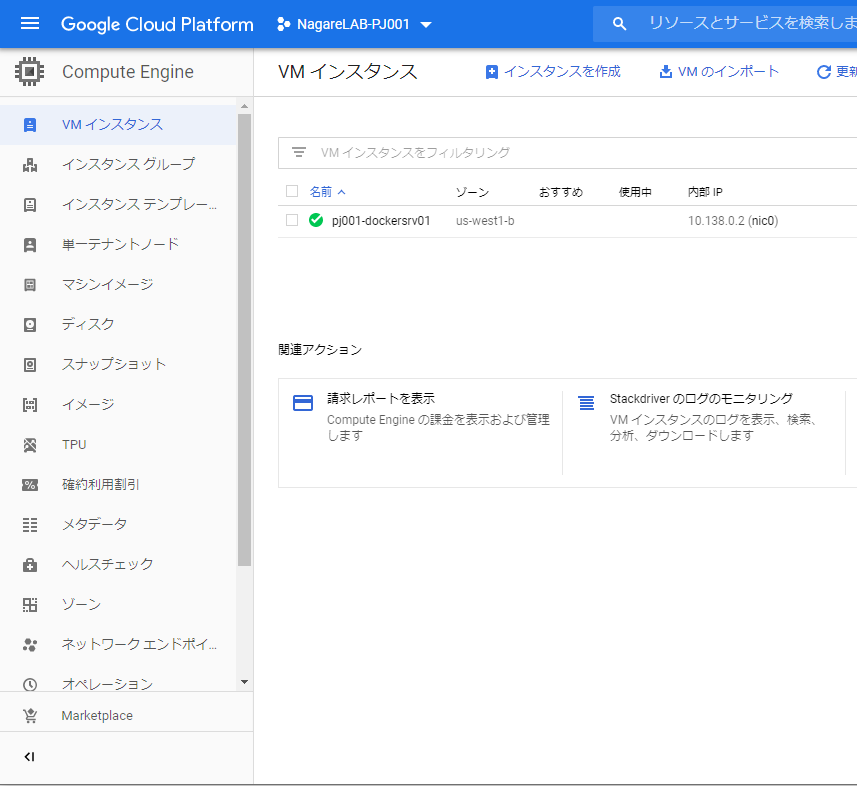
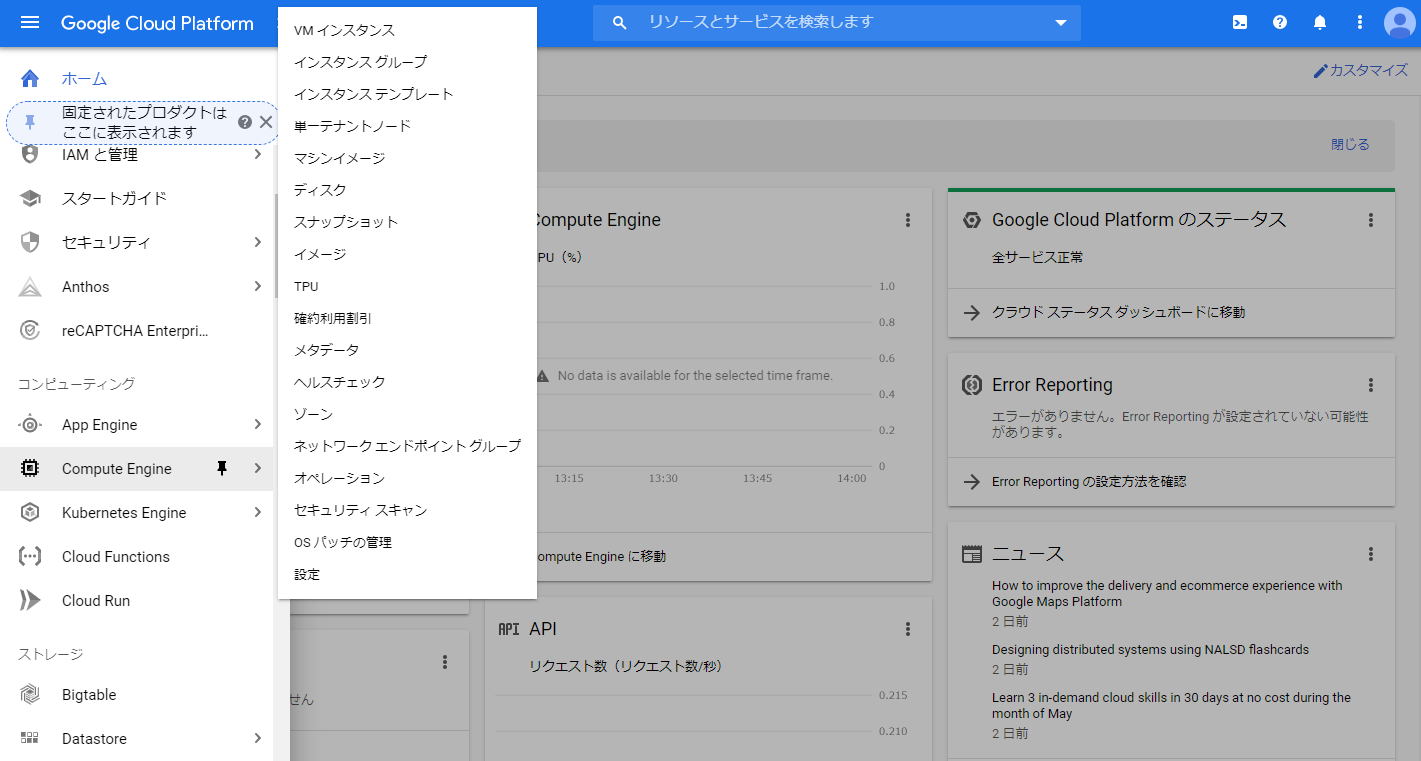
- 左のナビゲーションメニューから “Compute Engine” をクリック。
- スナップショットを作成する元のVMインスタンスを確認する。
- 以下の例では “pj001-dockersrv01” 。
Google and Google Cloud Platform™ are trademarks of Google LLC and this website is not endorsed by or affiliated with Google in any way.
- 以下の例では “pj001-dockersrv01” 。
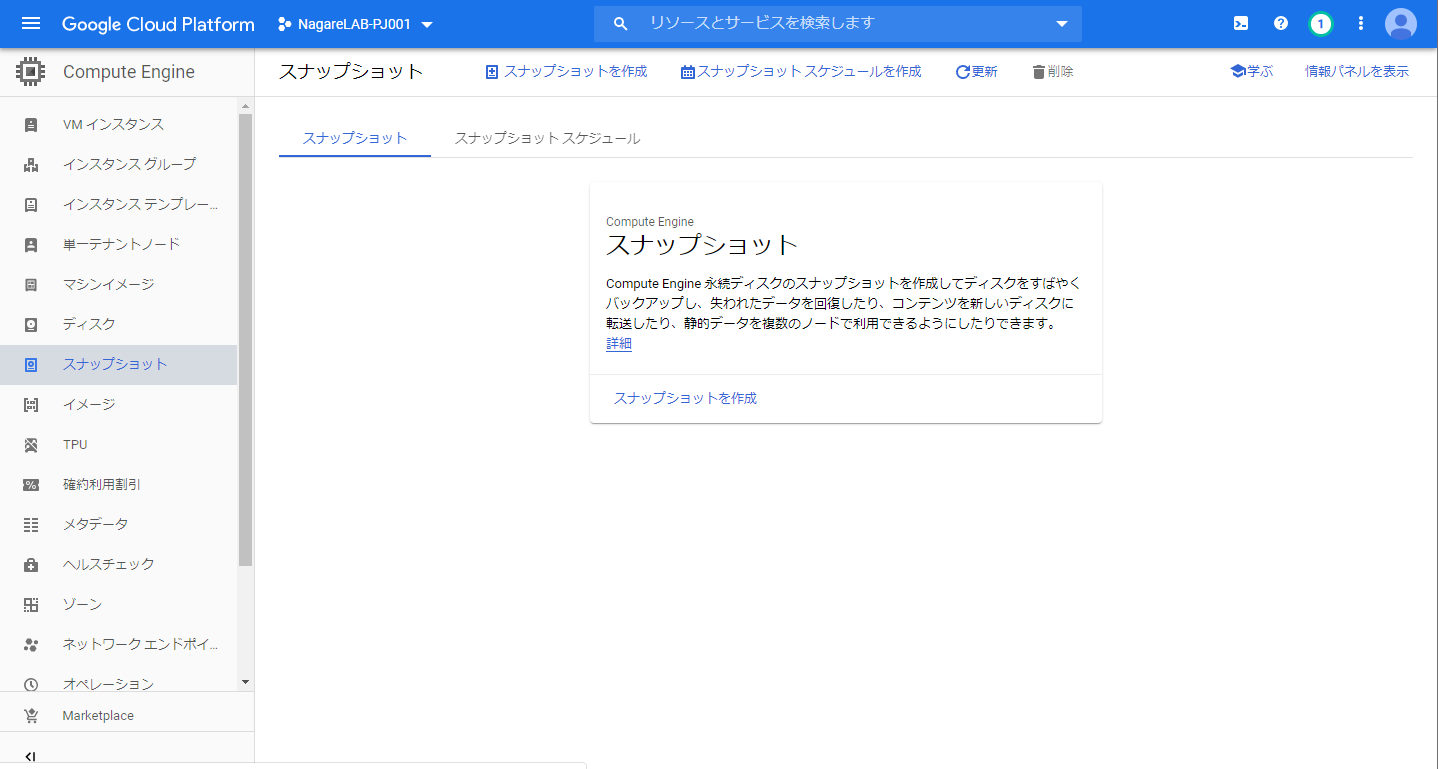
- 左のナビゲーションメニューの “Compute Engine” 中の “スナップショット” をクリック。
- 画面上部の “スナップショットを作成” をクリック。
- 一度もスナップショットを作成したことがない場合は、以下の画面が表示されるので画面中央の “スナップショットを作成” をクリックしても良い。
Google and Google Cloud Platform™ are trademarks of Google LLC and this website is not endorsed by or affiliated with Google in any way.
- 一度もスナップショットを作成したことがない場合は、以下の画面が表示されるので画面中央の “スナップショットを作成” をクリックしても良い。
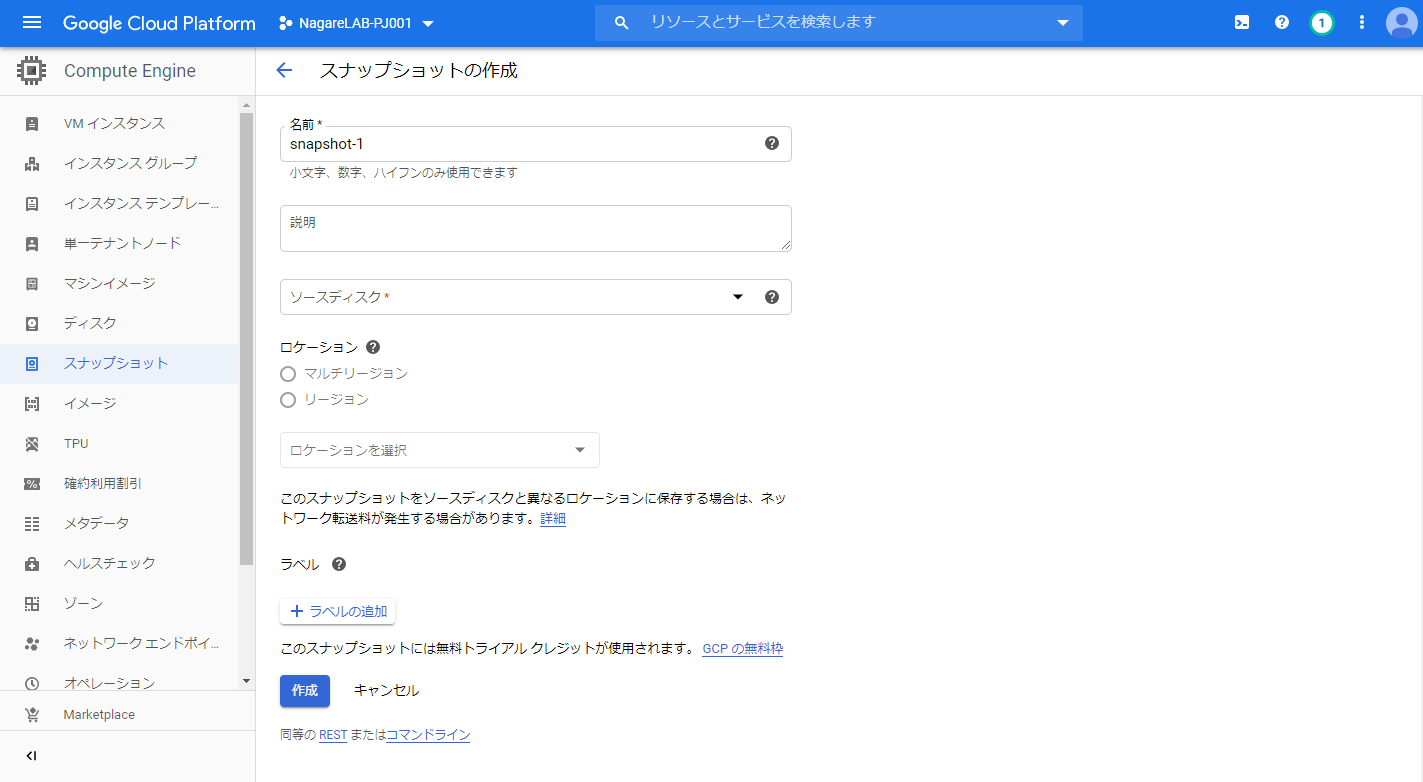
- “スナップショットの作成” 画面が表示される。
Google and Google Cloud Platform™ are trademarks of Google LLC and this website is not endorsed by or affiliated with Google in any way.
- 以下の必要項目を入力および選択。
- 名前
- スナップショットの名前を入力。
- 以下の例では “pj001-dockersrv01-sshot01”を入力。
- スナップショットの名前を入力。
- ソースディスク
- スナップショットを取得したいVMインスタンスのディスクを選択。
- 以下の例では先程確認したVMインスタンスである “pj001-dockersrv01” を選択。
- スナップショットを取得したいVMインスタンスのディスクを選択。
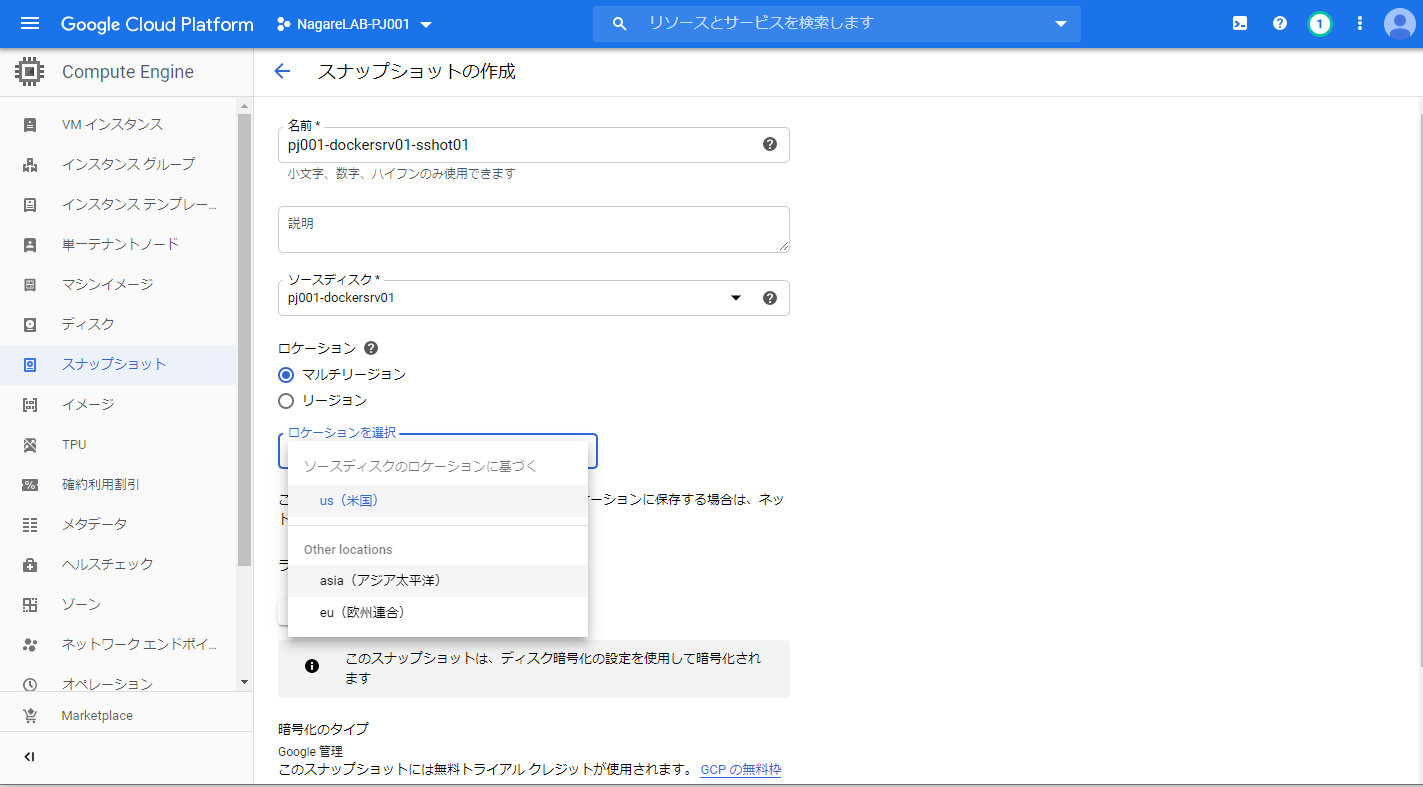
- ロケーション
- “マルチリージョン” を選択すると、ロケーションで地域を “us” 、”asia” 、 “eu” から選択する。その選択した地域内で2つ以上のリージョンにスナップショットが保持される。複数のリージョンにスナップショットが保持されることになるので、重要なVMインスタンスのバックアップ時などに選択するのが望ましい。ただし、複数保持されることになるの費用もスナップショットの数だけ高くなる。
- “リージョン” を選択すると、ロケーションで リージョンを選択する。選択したリージョンにスナップショットが保持されることになる。選択したリージョンにのみ保持されるのでマルチリージョンより安価になる。
- 以下の例では “リージョン” を選択し、無料枠で利用可能な “us-west1 (オレゴン)”を選択。
Google and Google Cloud Platform™ are trademarks of Google LLC and this website is not endorsed by or affiliated with Google in any way.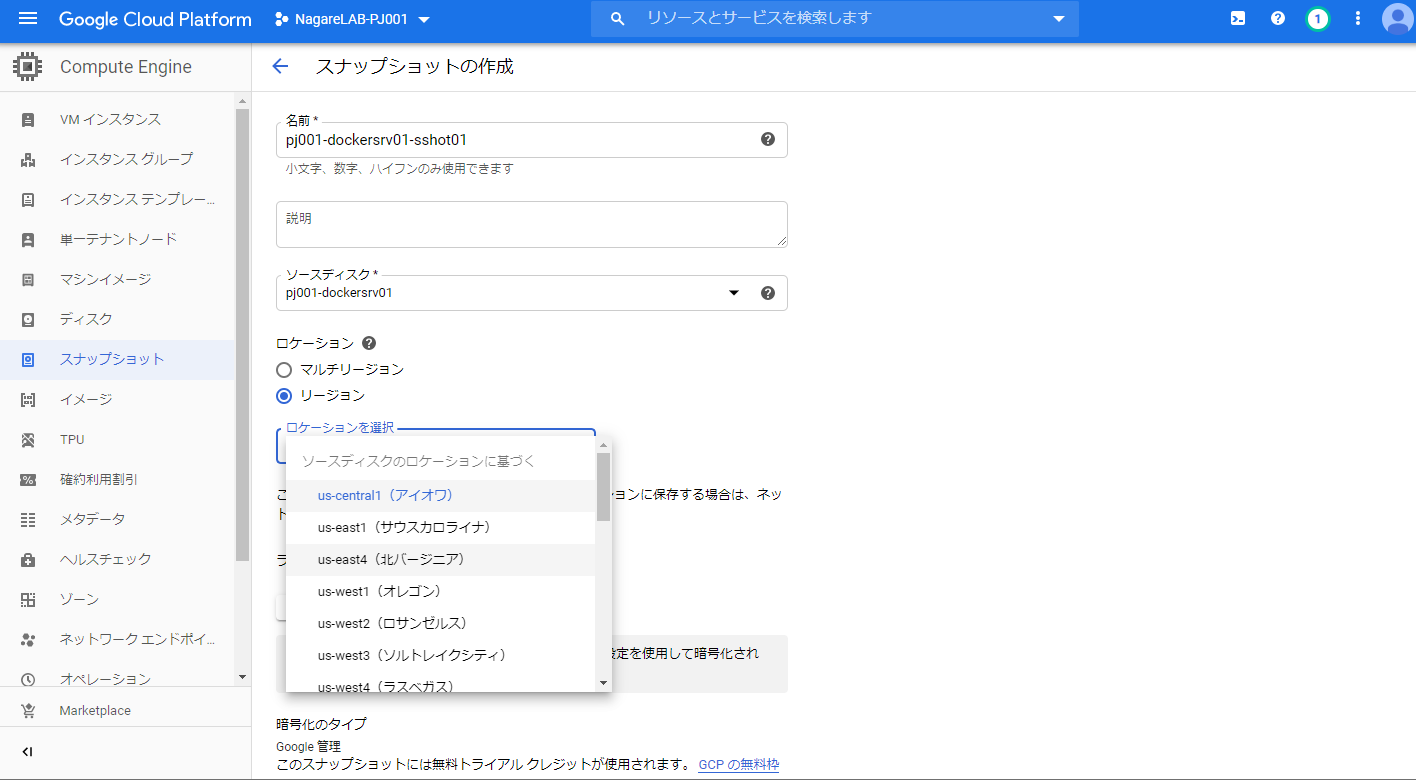 Google and Google Cloud Platform™ are trademarks of Google LLC and this website is not endorsed by or affiliated with Google in any way.
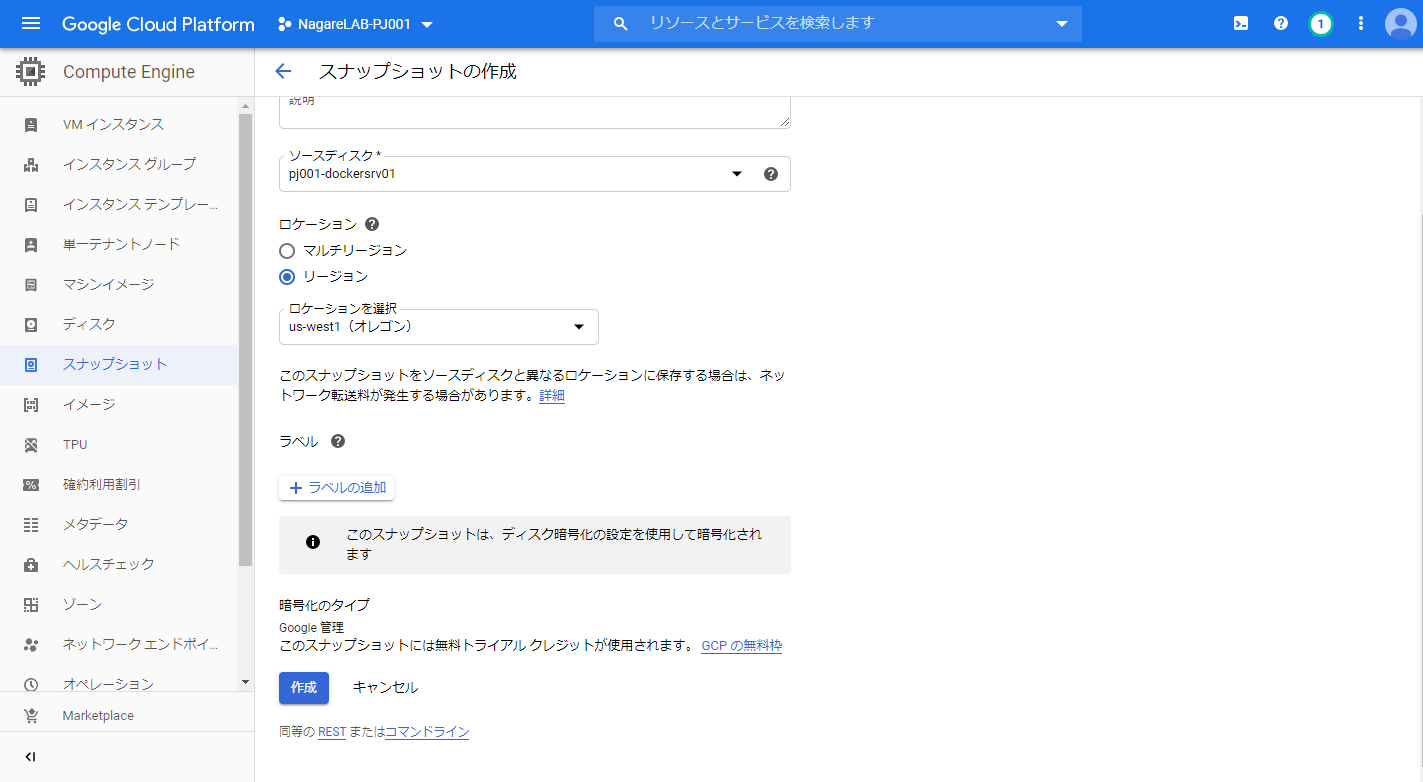 Google and Google Cloud Platform™ are trademarks of Google LLC and this website is not endorsed by or affiliated with Google in any way.
- 以下の例では “リージョン” を選択し、無料枠で利用可能な “us-west1 (オレゴン)”を選択。
- 名前
- 必要な項目の入力および選択が完了したら、画面下部の “作成” をクリック。
Google and Google Cloud Platform™ are trademarks of Google LLC and this website is not endorsed by or affiliated with Google in any way.
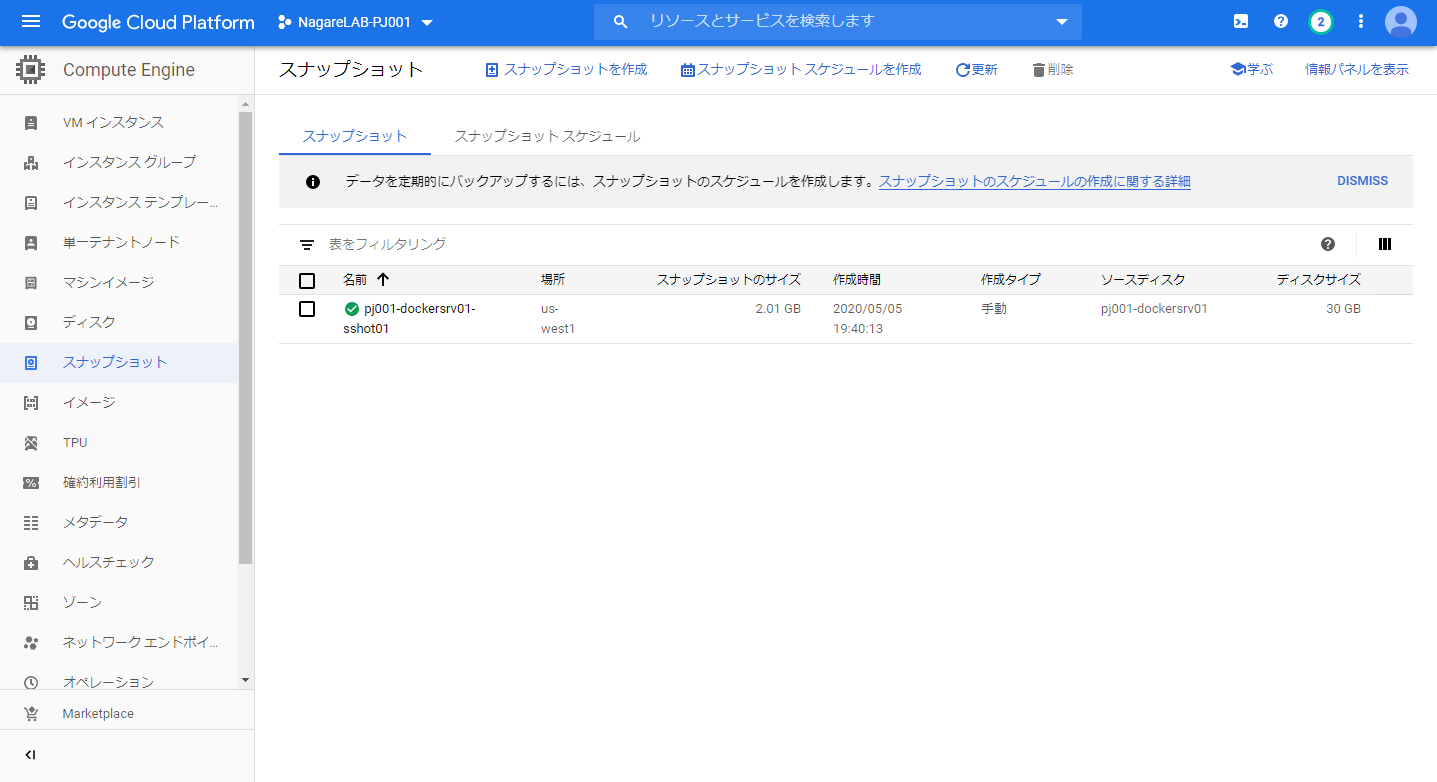
- 少し待つと、以下の画面の通り設定した名前のスナップショットの横にグリーンのチェックマークがつき作成が完了する。
Google and Google Cloud Platform™ are trademarks of Google LLC and this website is not endorsed by or affiliated with Google in any way.
以上がGCE スナップショットの作成手順となる。本ナレッジでは手動による都度作成の手順を示したが、自動での定期的なスケジュール作成も可能となる。そちらについては別ナレッジにて記載する。
GCE スナップショットからのVMインスタンス作成手順
スナップショットからGCEのVMインスタンスを作成する手順を以下に記載する。
- GCPコンソールにアクセス
- ポータルサイトの左メニュー内の ”Compute Engine” 項目の ”VM インスタンス” をクリック。
Google and Google Cloud Platform™ are trademarks of Google LLC and this website is not endorsed by or affiliated with Google in any way.
- “インスタンスを作成” をクリック。

Google and Google Cloud Platform™ are trademarks of Google LLC and this website is not endorsed by or affiliated with Google in any way.
- インスタンス作成画面が表示される。

Google and Google Cloud Platform™ are trademarks of Google LLC and this website is not endorsed by or affiliated with Google in any way.
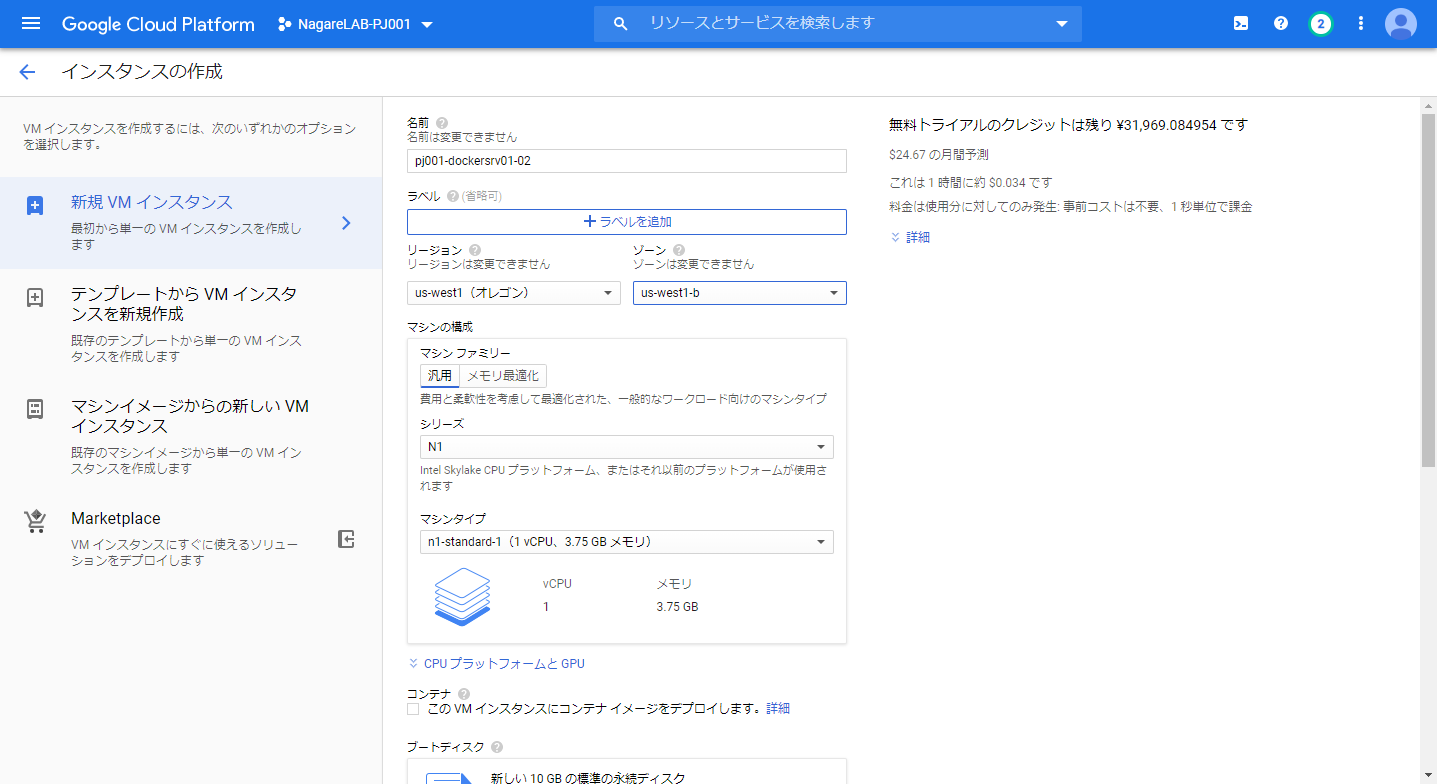
- ”名前” 、”リージョン”、 “ゾーン”、”マシン構成” を入力および選択。以下に設定例を示す。適宜システムの必要構成に応じて修正。
- 名前: pj001-dockersrv01-02
- リージョン: us-west1 (無料枠利用可能)
- ゾーン: 一台構成であれば何を選択しても良い
- マシン構成: 以下の例では、N1 – n1-standard-1 を設定しているが、無料枠利用するためには E2 – e2-micro を設定する必要がある
Google and Google Cloud Platform™ are trademarks of Google LLC and this website is not endorsed by or affiliated with Google in any way.
- ”ブートディスク” の “変更” をクリック。
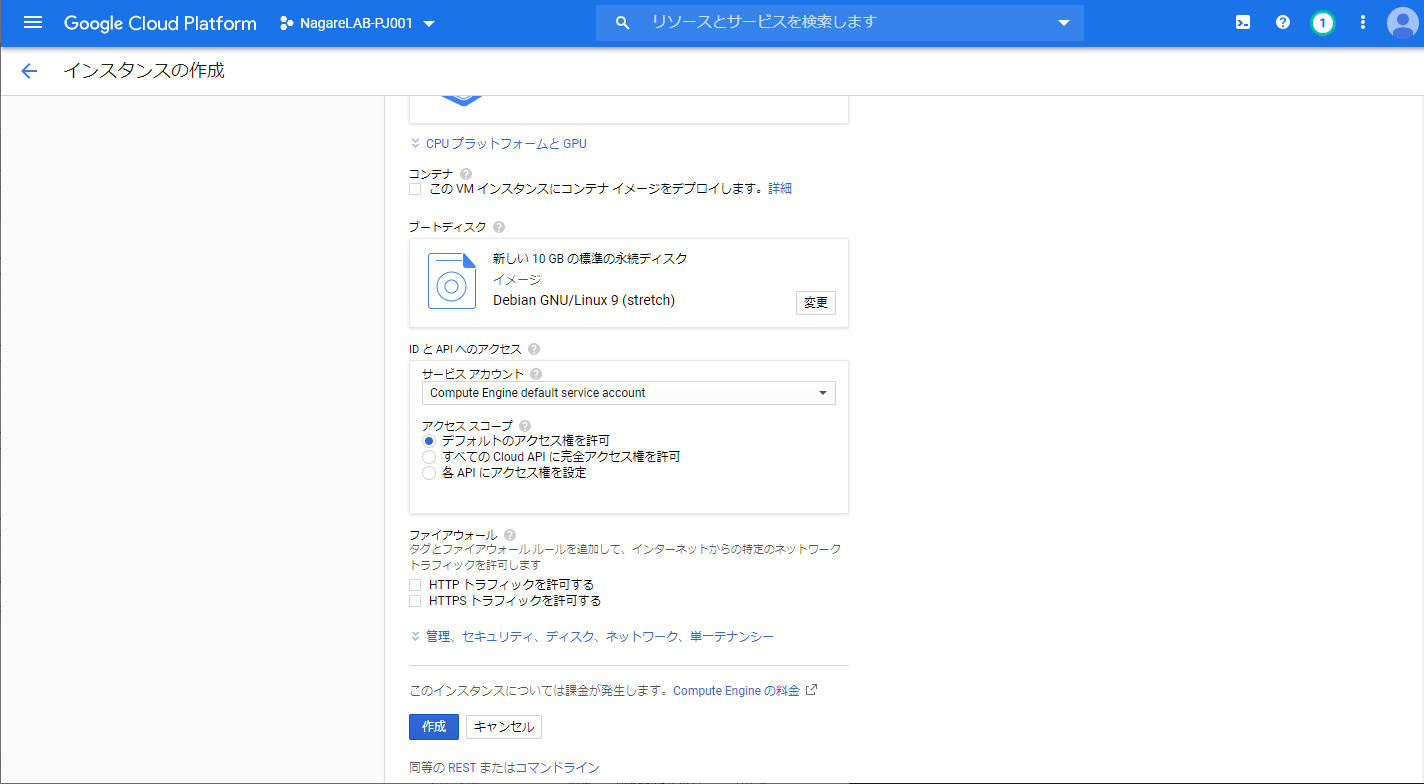
Google and Google Cloud Platform™ are trademarks of Google LLC and this website is not endorsed by or affiliated with Google in any way.
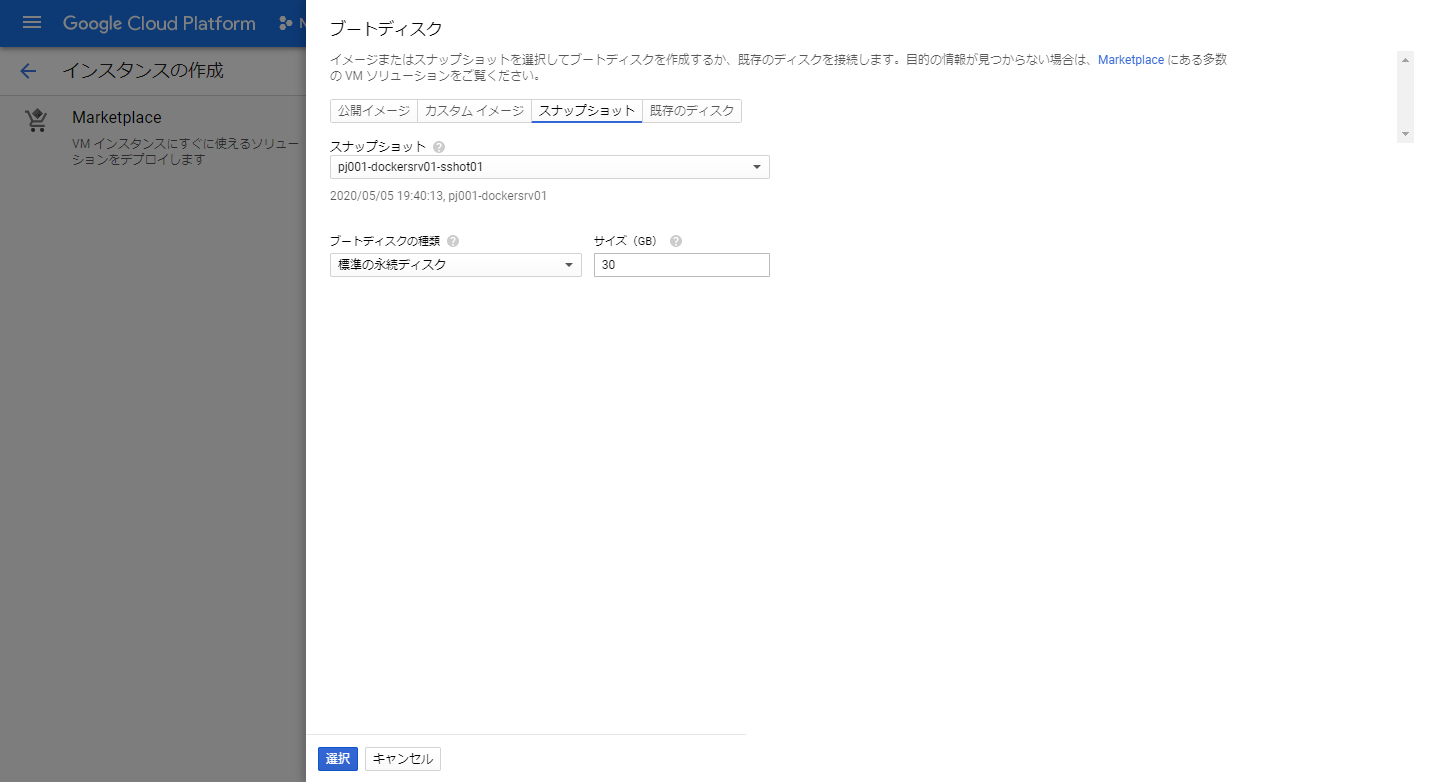
- “ブートディスク” の選択画面が表示される。
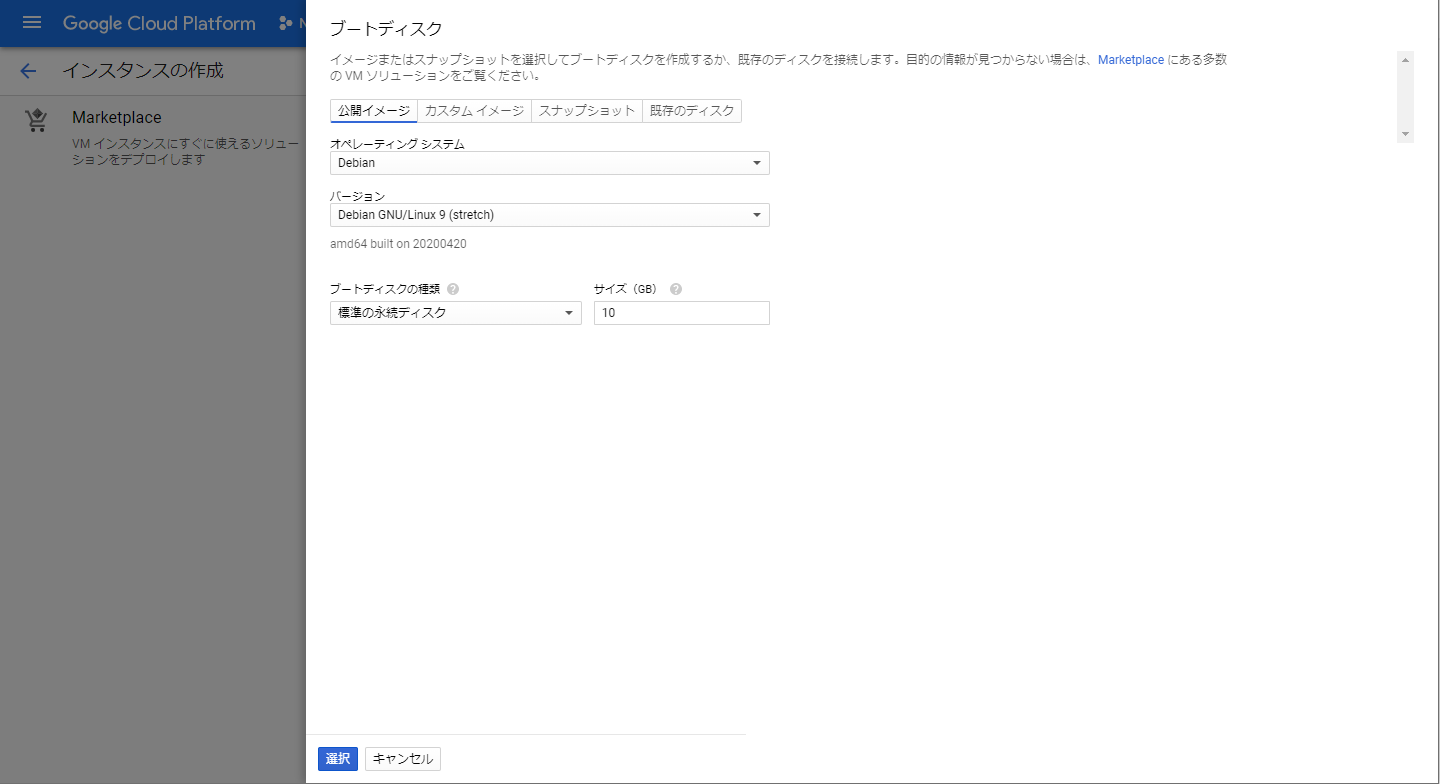
Google and Google Cloud Platform™ are trademarks of Google LLC and this website is not endorsed by or affiliated with Google in any way.
- “スナップショット” タブをクリック。

Google and Google Cloud Platform™ are trademarks of Google LLC and this website is not endorsed by or affiliated with Google in any way.
- ここで選択したスナップショットからVMを作成することになる。設定例を以下に示す。
- スナップショット: スナップショットの中からVMの元としたいものを選択。
- 本例では前述の手順にて作成した “pj001-dockersrv01-sshot01” を選択。
- ブートディスクの種類: ディスクの種類を選択。
- 本例では “標準の永続ディスク” を選択。
- サイズ: ディスクのサイズを選択。スナップショットの元としたVMのディスクサイズの同値もしくはそれ以上を選択するのが望ましい。
- 本例では “30” を選択。 (無料枠での最大値)
- スナップショット: スナップショットの中からVMの元としたいものを選択。
- 必要な設定を選択したら、画面下の “選択” をクリック。
Google and Google Cloud Platform™ are trademarks of Google LLC and this website is not endorsed by or affiliated with Google in any way.
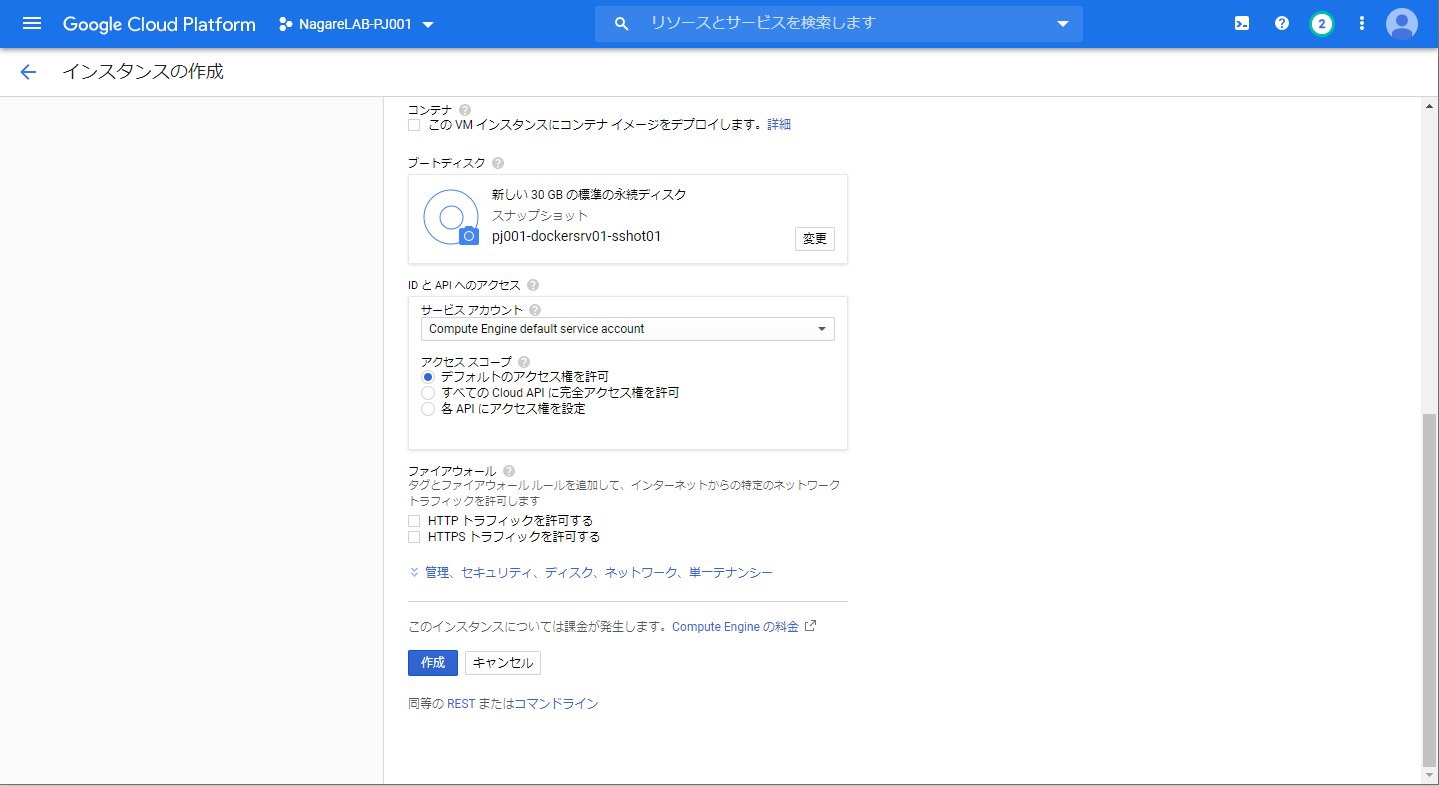
- “ブートディスク” には選択したものが入っていることが分かる。
- “ファイアウォール” 項目の “HTTP トラフィックを許可する”、 “HTTPS トラフィックを許可する” は、本IaaSにてWeb公開等を考えている場合はチェックする。特にWebへ公開する用途のサーバではないのであればオフにしておく。
- “管理、セキュリティ、ディスク、ネットワーク、単一テナンシー” をクリックすると、ネットワーク等の詳細設定が可能である。
- 特に変更しなくてもVM作成は可能だが、本ナレッジでは例としてVMを所属させるネットワークについて変更する。そのため、クリックする。
Google and Google Cloud Platform™ are trademarks of Google LLC and this website is not endorsed by or affiliated with Google in any way.
- 特に変更しなくてもVM作成は可能だが、本ナレッジでは例としてVMを所属させるネットワークについて変更する。そのため、クリックする。
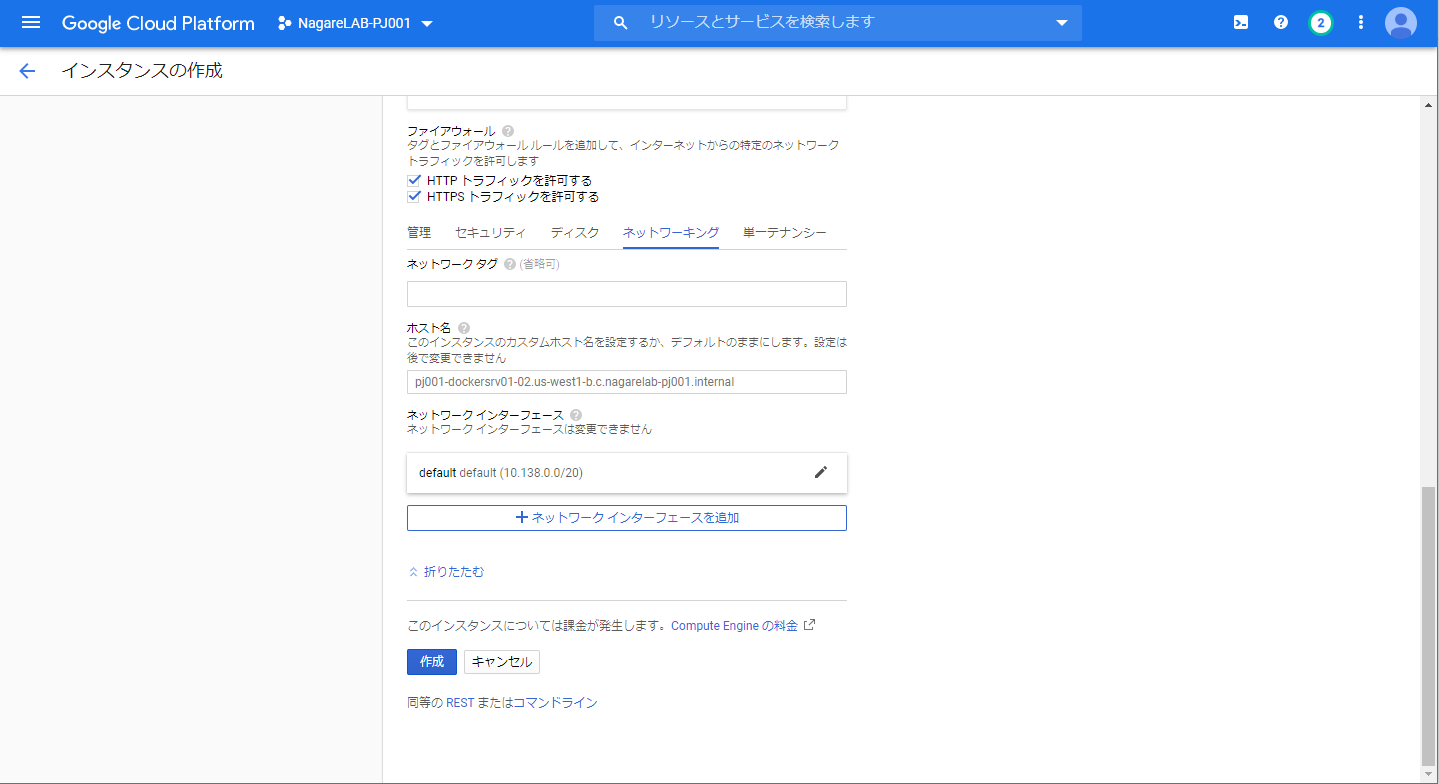
- 以下の通り、 “管理、セキュリティ、ディスク、ネットワーク、単一テナンシー” の設定欄が表示される。本例ではVMを所属させるネットワークについて変更するため “ネットワーキング” タブをクリック。
ポータル上の表示が更新され、以下の画面キャプチャと異なる場合があるが、項目はほぼ同一のため、適宜読み替える。 - “ネットワーク タグ” および “ホスト名” は必要に応じて設定するが、特段設定しなくても問題ない。本例では特に設定していない。
- 本例ではVMの既定値として “default” ネットワークに接続しているネットワークインタフェースを変更する。そのため、 “default” の右にある鉛筆マークをクリック。もし必要であれば “ネットワークインタフェースの追加” で複数のNICをVMに持たせることも可能である。
Google and Google Cloud Platform™ are trademarks of Google LLC and this website is not endorsed by or affiliated with Google in any way.
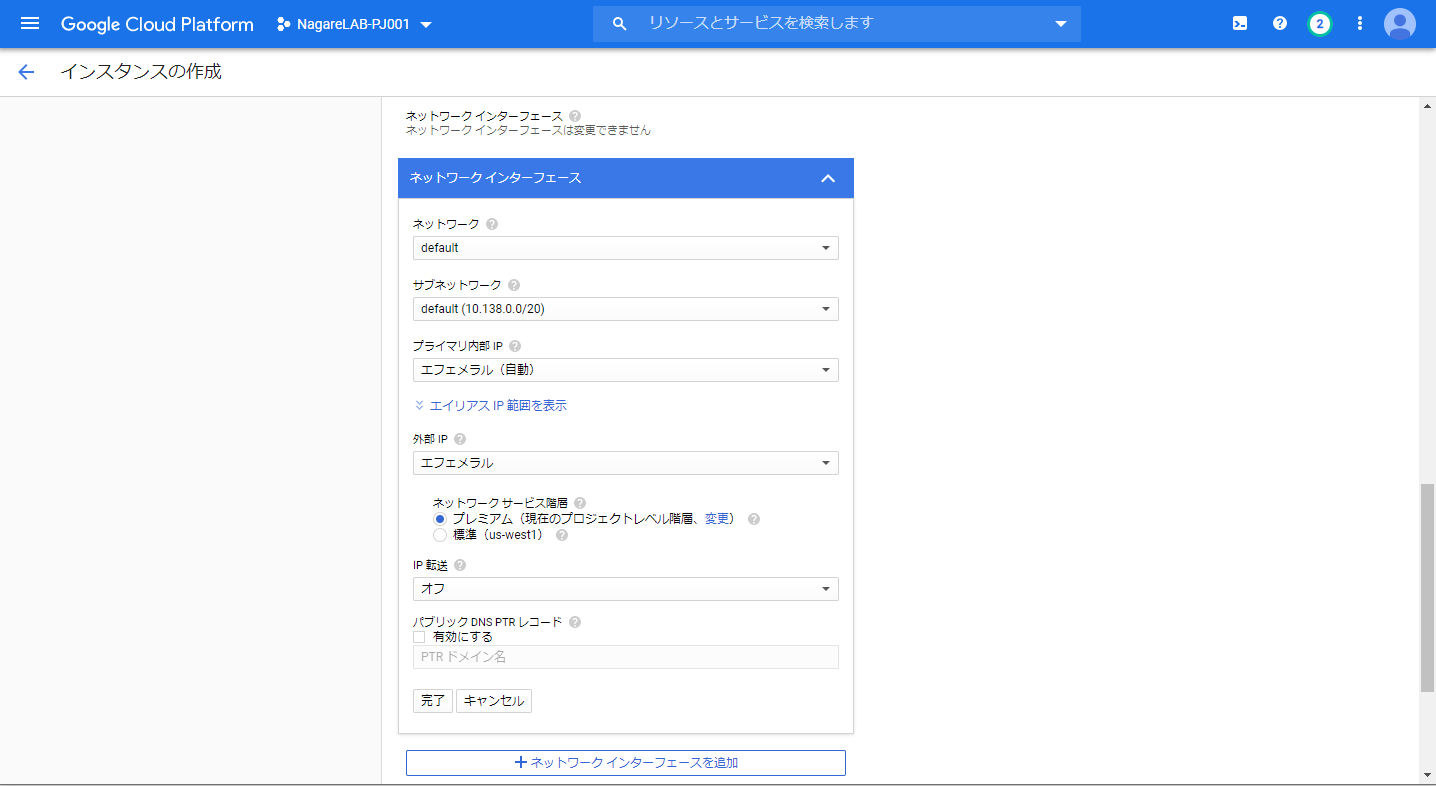
- 以下の通り、既定で設定されている “default” ネットワークに接続しているネットワークインタフェースの詳細ページが開く。
Google and Google Cloud Platform™ are trademarks of Google LLC and this website is not endorsed by or affiliated with Google in any way.
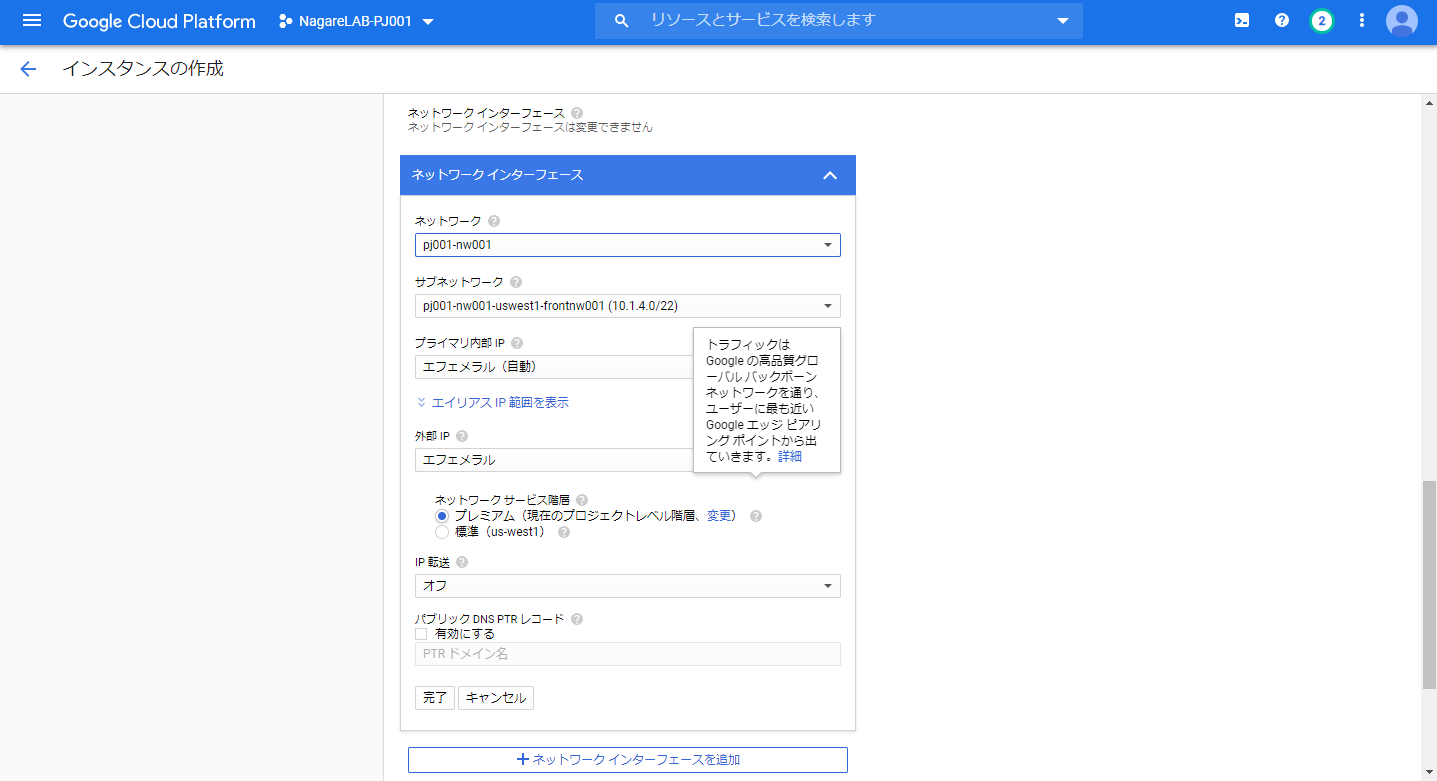
- 必要な設定項目を変更する。例を以下に示す。
- ネットワーク: VMの選択したネットワークインタフェースを接続するネットワークを選択。
- 以下例では予め作成しておいたネットワークである “pj001-nw001” を選択。
- サブネットワーク: VMの選択したネットワークインタフェースを接続するサブネットワークを選択。
- 以下例では予め作成しておいたネットワークである“pj001-nw001-uswest1-frontnw001” を選択。
- プライマリ内部IP: 内部IPを静的に指定するか選択可能である。ただし、静的でなくエフェメラルを選択したとしてもVMを再起動してもIPに変化はない。VMを削除して再作成した場合に変化する。
- 以下例では “エフェメラル(自動)” を選択。
- 外部IP: 外部IPは内部IPと同様にエフェメラルかIPアドレスを作成して静的にするか選択。
- 以下例では “エフェメラル” を選択。
- “ネットワークサービス階層” や “IP転送” 、 “パブリック DNS PTR レコード” については必要に応じて修正。
- 以下例では特に修正せず既定値としている。
- ネットワーク: VMの選択したネットワークインタフェースを接続するネットワークを選択。
- “完了” をクリック。
Google and Google Cloud Platform™ are trademarks of Google LLC and this website is not endorsed by or affiliated with Google in any way.
- “ネットワーク インタフェース” について、 “default” だったものが、設定しないように更新されていることが確認出来る。
- “作成” をクリック。

Google and Google Cloud Platform™ are trademarks of Google LLC and this website is not endorsed by or affiliated with Google in any way.
- VMインスタンス作成がはじまり、少し待つと緑色のチェックマークを表示されVMインスタンスの作成が完了する。
- 以下例では先程指定した “pj001-dockersrv01-02” という名前のVMが作成されたことが分かる。
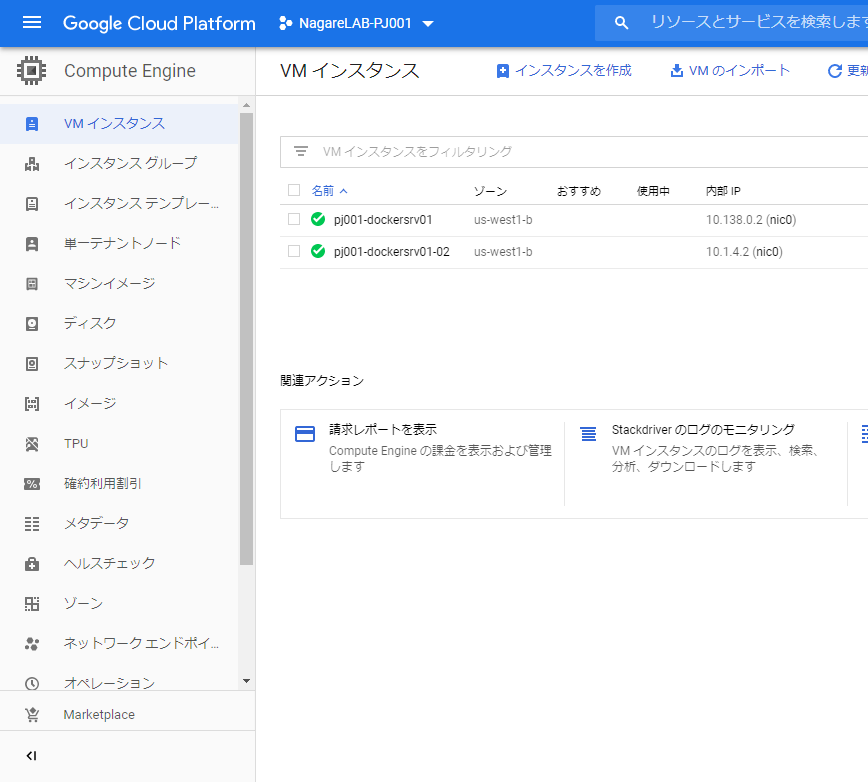
Google and Google Cloud Platform™ are trademarks of Google LLC and this website is not endorsed by or affiliated with Google in any way.
- 以下例では先程指定した “pj001-dockersrv01-02” という名前のVMが作成されたことが分かる。
以上がGCE スナップショットからのVMインスタンス作成手順となる。
Sponsored Links